Table of Contents
Collection Action Results Setup
E-collection Letter Print Options
Collection Letter History / Action History
Location Setup - Statements Tab
User Defined Fields - Encounter
Encounter Review - Change Status
Production Environment
DAQbilling is migrating to a new production environment to improve performance and reliability.
Collections
DAQbilling has added a new collections module to manage collection letters and patient payment plans.
Note: The user will need to have the permissions added under their user settings before they are able to access these screens.
Collection Setup
Collection setup allows the user to do the following:
· Setup what values qualify a patient for collections
· Indicate the types of credit cards accepted
· Configure and customize each collection letter
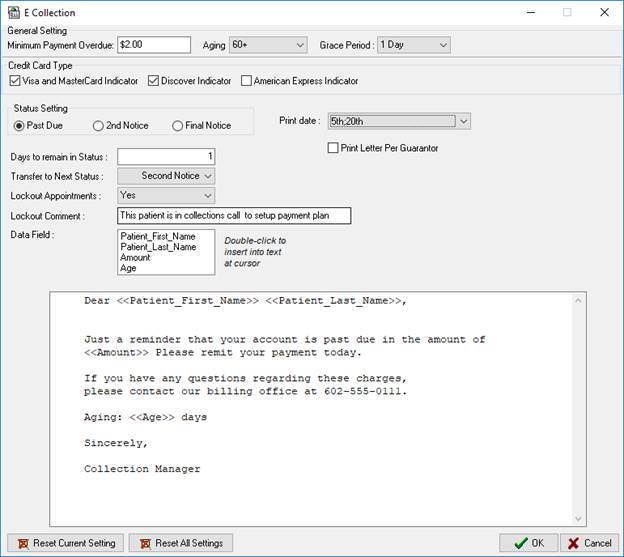
Collection setup is located under setup > other setup > Collection setup
General Settings
Minimum Payment Overdue - minimum amount owed by the patient to qualify for collections
Aging - minimum amount of patient aging needed to qualify for collections
Grace Period - the number of days after a missed payment due date the system will allow a delinquent payment to be made before moving the patient into a non-compliant status and qualifying them for a collection letter
Credit Card Indicators - indicate the types of credit cards that are accepted
Visa and MasterCard Indicator - Send a Visa and MasterCard accepted indicator on the collection letter
Discover Indicator - Send a Discover Card accepted indicator on the collection letter
American Express Indicator - Send an American Express Card accepted indicator on the collection letter
Print Date
Print Date - the days of the month collections letters will print.
Print Letter Per Guarantor - print collection letters with guarantor name and address in place of the patients.
Status Setting
Each collection letter has its own settings and letter configuration. Each collection letter will need to be configured for the collection letters to work properly.
Collection letter statuses: Past Due, 2nd Notice, Final Notice
Click on each collection letter status to configure the following settings:
Days to remain in status - the number of days a patient will remain in a specific collection letter status (past due, 2nd notice, final notice) after printing before being moved to the next status based on the collection configuration.
Transfer to next status - allows the user to select what status patients will be transferred to once the collection letter for the current status is printed
Lock out appointment - If set to yes, any patient in that is in collections will not be able to have an appointment scheduled in the system.
Lock out comment - The message that will be displayed when a user tries to schedule an appointment for a patient in collections when lockout is set to yes
Data Field - are placeholders used to represent various system values that can be inserted into the collection letter template and replaced with the system value at the time of printing. (Example: Patient_last_name). Double click on the data field name to add it to the letter template. Make sure to add a space after each data field or the names/amounts will run together.
Data field listing
Patient_first_name - displays the patient first name
Patient_last_name - displays the patient last name
Amount - displays the monetary amount owed by the patient (ex. $800.50)
Age - displays the max aging in days (ex. 80)
Letter Template - The letter template allows are user to create a custom collection letter for each collection notification status. The temple should be written the same way a normal letter would be. The values in the template are exactly what will be printed on the collection letter.
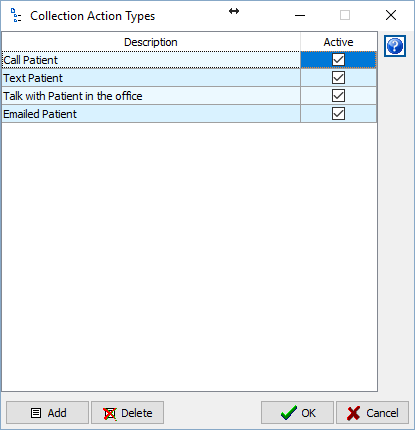
Collection Action Types Setup
Collection action types are actions a user takes when working with a patient in regards to being collections. Examples include calling or emailing the patient. This setup is required to be able to use payment plans and notes.
The Collection Action Type Setup is located under setup > other setup > Collection Action Types
To add a collection action type:
1. Click the 'Add' button at the bottom left of the screen. A new blank line will appear on the list.
2. Type the action description. The active check box will be check by default.
3. Click 'OK' to save.
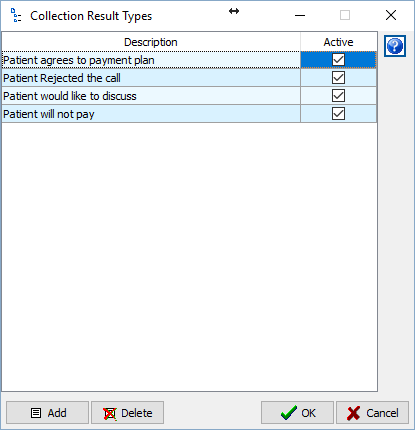
Collection Action Results Setup
Collection action result types are the results from the collection action the user had with the patient in collections. Examples include the patient agreeing to pay off the balance. This setup is required to be able to use payment plans and notes.
The Collection Action Type Setup is located under setup > other setup > Collection Action Results
To add a collection action Result type:
1. Click the 'Add' button at the bottom left of the screen. A new blank line will appear on the list.
2. Type the result description. The active check box will be check by default.
3. Click 'OK' to save.
Collection Review
The collection review screen is the main collection screen where the user can manage all patients that are in collections or eligible for collections. This includes printing collection letters, creating patient payment plans, recording/reviewing collection history, and making patient payments.
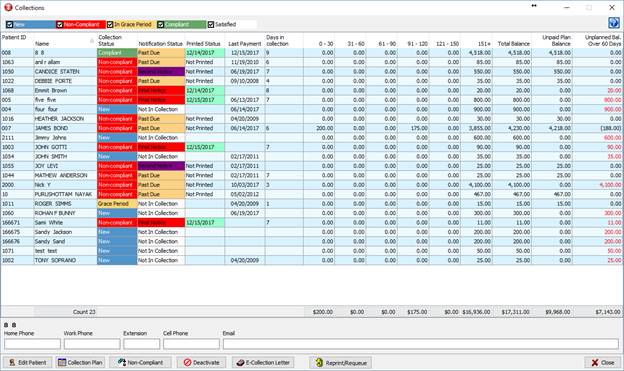
Collection Status:
New - Indicates that the patient qualifies for collections based on the collection setup. The patient is not actually in collections until the user moves them into collections
Non-Compliant - Indicates that the patient qualifies to have collection letters sent to them. A patient will only receive a collection letter if they are in this status. For a patient to move into this status the user can force the patient to non-compliant or if the patient defaults on a payment plan.
In Grace Period - Indicates that the patient has missed a payment due day. The purpose of grace period to give the patient a few extra days to make a payment past the due date. The days that the patient will be in grace period is based on the grace period setting on the collection setup. If no payment is made before the grace period is up, the patient is moved to a non-compliant status and is eligible for a collection letter.
Compliant - Indicates that the patient has been making payments on time based on the collection plan. While in this status, the patient will not receive a collection letter.
Satisfied - Indicates that the patient was in collections and paid off their debt based on the payment plan. The patient will remain in this status until the user removes them from collections.
Notification Status:
Past Due - The first collection letter the patient will receive.
Second Notice - The second collection letter the patient will receive.
Final Notice - The final collection letter the patient will receive.
Collection Review Buttons
Edit Patient - Will open the patient demographic screen to edit the patient.
Collection Plan - Will open the collection plan screen. From this screen, the user can record/review their actions and notes on the patient in collections, create a payment plan, and make a payment.
Non-Complaint - Will move a patient to a non-complaint status. This makes them eligible to receive a collection letter. To use this button select the patient(s) on the collection review screen that are to be moved into a non-compliant status and then click non-compliant button.
Deactivate - Will remove a patient from collections. If the patient still qualifies for collections, they will still display on the screen in a new status.
E-Collection Letter - Will display print options for collection letters.
Reprint/Requeue - Will display the reprint/requeue screen. This screen allows the user to reprint collection from a specific day on the user's machine or requeue them to have them printed by DAQbilling.
Collection Plan Screen
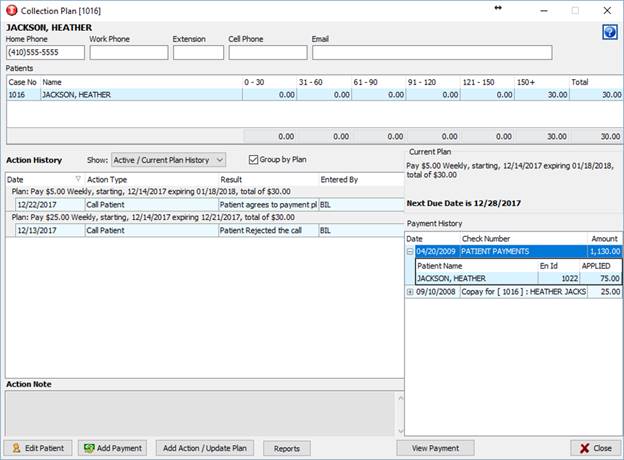
Edit Patient - Will open the patient demographic screen to edit the patient.
Add Payment - Will open the payment screen.
Reports - Will Print a payment plan report based on the latest payment setup for the patient.
View Payment / Encounter Maintenance - If a payment is selected under payment history, view payment will display. If view payment is clicked, it will display a read only view of the payment. If the patient name is selected, encounter maintenance will display. If encounter maintenance is clicked, it will display the encounter maintenance screen for the patient.
Action History - Displays the transaction history including action, results, notes, and past payment plans.
Show History Options
Show: Current Plan History - will display the transaction
Show: All History - will display all the transaction for current and past
Current plan - Will display the active payment plan. If there is no payment plan setup, it will display "No Plan"
Payment history - Shows a list of the patient payments.
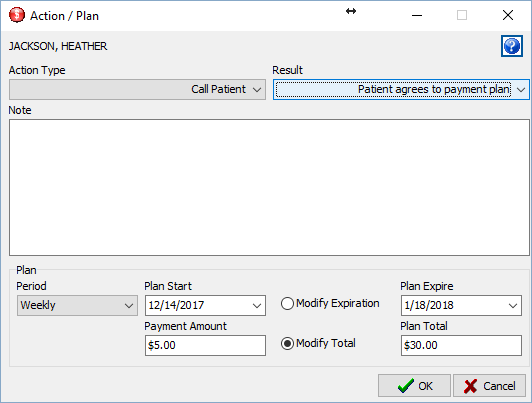
Add Action / Update Plan
Action Type - Action taken on the patient in collections. (Refer to collection action type setup to configure )
Result - Result of the action type (Refer to collection result type setup to configure)
Note - Notes associated with the action.
Plan - Payment plan configuration:
Period - Frequency of the payments.
Plan Start - The first payment due date.
Plan Expire - Calculated plan end date based on period, plan start, and payment amount. If modify expiration is select and the plan expired date is change, than the payment amount will recalculate to accommodate the change.
Payment Amount - The amount expected to be paid on each due date.
Plan Total - The total amount owed by the patient for this payment plan. By default, this amount will be the total balance owed by the patient. If modify total is selected and plan total is change, than the plan expire will be recalculated to accommodate the change.
Note: To update the payment plan, change any of the fields and click OK to save.
E-collection Letter Print Options
Selected Patient - Will print collection letter for selected patients if they eligible to have a letter printed.
All Patients - Will print collection letters for all patient that are eligible to have a letter printed.
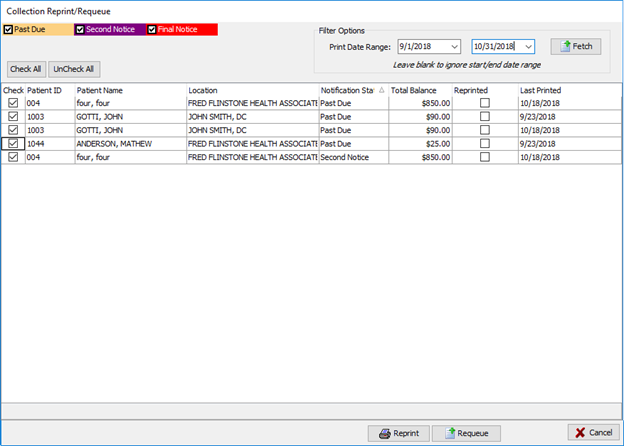
Reprint/Requeue Screen
Reprint/Requeue allows a user to recall collection letters that have already been print and either reprint them to a local printer or have printed and mailed through CGM.
To reprint/requeue collections letters, select a date range and click fetch. This will display a list collection letters that have been printed during the selected date range. To select a collection letter to reprint/requeue check the box next to that letter. By default, all the boxes will be checked. Click either reprint or requeue depending on the situation.
Print Date Filter - Filters results based day collection letters were printed.
Notification Status filter - Filters results based notification status.
Reprint - Will reprint the selected collection letters to a printer.
Requeue - Will add the collection letter to the queue to printed and mail through CGM.
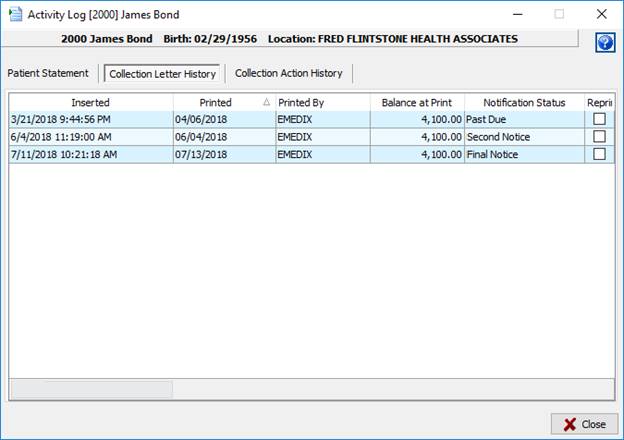
Collection Letter History / Action History
The collection letter history / action history is located under Encounters > Encounter Maintenance > Activity Log
Collection Letter History - Will show the collection letter print history.
Collection Action History - will show the action history that appears on the collection plan screen.
Patient Statements
DAQbilling has updated its patient statement to a new layout, moved control of the print settings to the user, and modified how the user can search and add patients to the statement queue.
Note: The user will need to have the permissions added under their user settings before they are able to access these screens.
Print Settings
The setting print settings are located under Setup > Other Setup > Patient Statement Setup.
These settings only apply to clients that are contracted to have patient statements printed by DAQbilling.
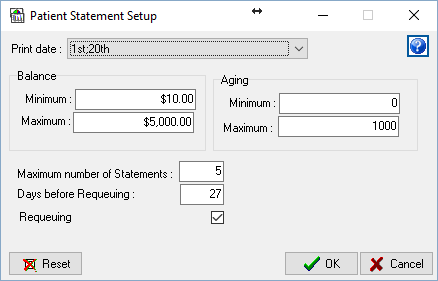
Print Date - Controls the days of the month that patient statements will print. Click on the dropdown menu to check off the days to print statements. The printing will continue to occur overnight as it currently does. If there are no days selects then no patient statements will print. If a day that is selected is not available in every month like the 31st, then printing will not occur during a month that does not have that day.
Balance - A minimum and maximum account balance can be setup to restrict if a statement is print based on its balance. If it is left blank then there will be no restriction.
Aging - A minimum and maximum days of aging can be setup to restrict if a statement is print based on its aging.
Requeue settings
Maximum number of statements - The maximum number of requeued statements that can be prints for a patient. Once this limit is reached, the patient will no longer receive a statement. The patient would need to manually added back to the statement queue to have a statement printed again. If a balance transfer to the patient occurs and the patient is added to the statement queue then the requeue count is reset.
Days before requeuing - The number of days since the last print date before a patient is eligible to have their statement requeued for printing. The recommended value is 27 under normal circumstance were statements are printed 2 more times per month. This will prevent a patient from receiving more than 1 statement per month.
Requeuing - Turns the requeuing process on and off. A checked box means requeuing is on and an unchecked box means requeuing is off. Please be aware that if requeuing is turned off a patient will only receive 1 patient statement unless they are manually added back to the statement queue or have a balance transfer. If the requeuing is turned off for an extended period of time and then turned back on, the patients that have a balance will need to be manually added back to the statement queue as the system will only requeue statements that were printed during the previous month.
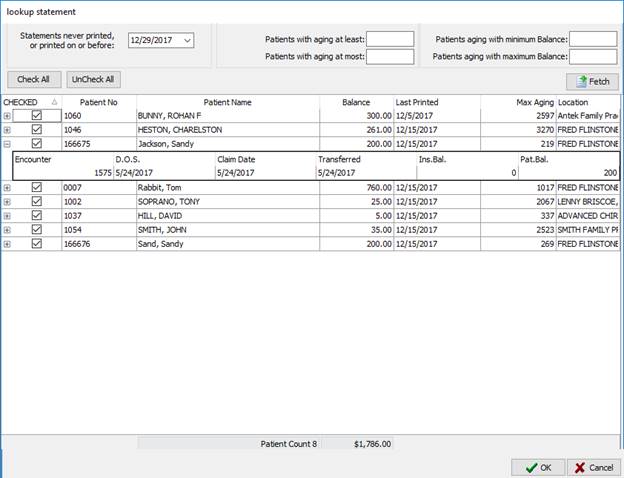
Patient Statement Lookup
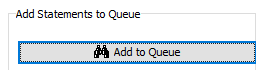
On the statement review screen, the 'Add to Queue' button will now open a search screen that can be used to filter and select patients to be added to the statement queue.
The Patient statement Lookup screen has the same filters that the previous screen had but a minimum and maximum balance filter have been added.
1. Once the screen is open, the user can enter the values for the filters.
2. Click Fetch and the search results will be displayed on the screen.
3. Check or uncheck the box to the left of patient ID (by default all the boxes are check) to indicate if they should be added to the statement queue.
4. Click ok when finished and the patients that are checked off are added to the statement queue.
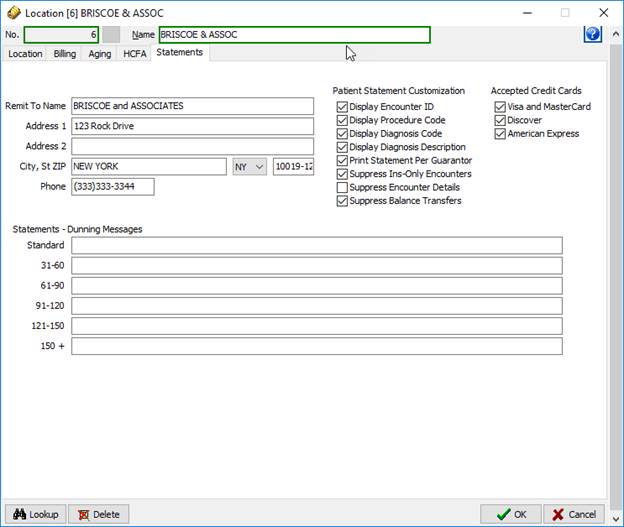
Location Setup - Statements Tab
All patient statement location settings have been moved to the statement tab on the location setup.
Remit to Address and phone number - This will be the remit to address and phone number that will appear on the patient statement and collection letters.
Patient Statement Customization - Allows for customization by adding or removing different elements of the statement.
Accepted Credit Cards:
Visa and Master Card - Will display a Visa and Master Card Icon on the statement.
Discover - Will display a Discover Icon on the statement.
American Express - Will display an American Express Icon on the statement.
Dunning Messages - Will display a message at the end of the statement based on aging.
CPT Import
A CPT code import utility has been added under the Utilities Tab.
1. Click on Import CPT Codes from Master List. The CPT Import window will display, which lists all the CPT codes and their descriptions that are found in the Master List.
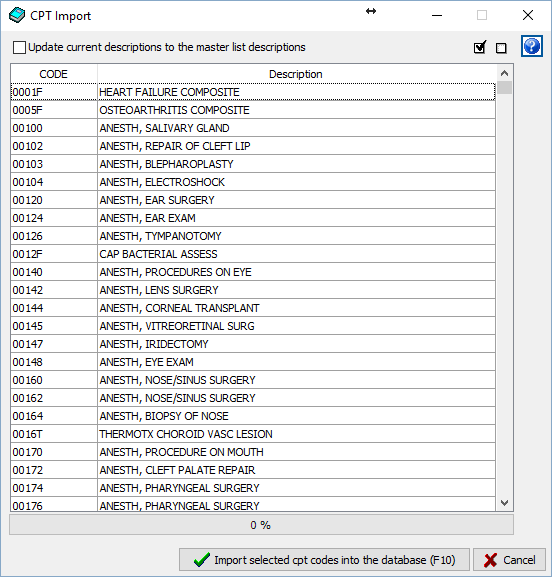
2. Select the CPT Code to import.
· To select all codes, press CTRL + A, or click the Select All icon.
· To select just a few random codes, highlight the first code to import and then hold the CTRL key and highlight any desired additional codes.
· To select a range of codes, highlight the first code to import and then hold the Shift key, scroll down and highlight the last code in the range to import.
3. To import the descriptions along with the codes from the Master List, mark the Update current descriptions to the master list descriptions check box. To keep the current descriptions of the client, make sure this box is not marked.
4. Once all the CPT Codes are selected, click Import selected diagnosis codes into the database. A dialog box will display asking for confirmation to import the codes. Click Yes to proceed.
5. The import will begin. A status bar will display the progress of the import and the window will close once it is complete.
Note: This process may take a very long time, depending on the number of codes being imported.
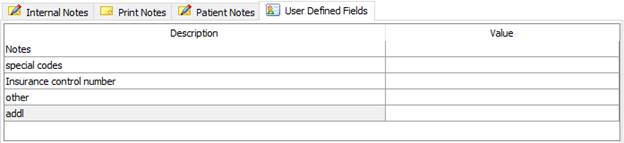
User Defined Fields - Encounter
User Defined Fields have been added to the encounter screen. When creating a user defined field under the practice settings there is now a drop down to select whether it is an encounter or patient user defined field.
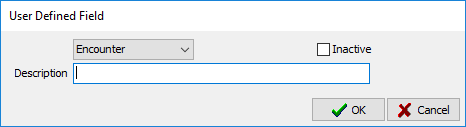
The encounter user defined fields are located on the encounter screen to the right of the patient notes tab.
Notes: Encounter user defined field are not sent in claim submissions.
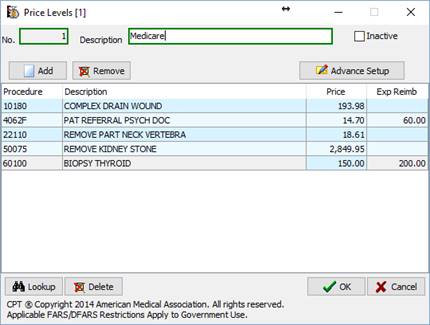
Price Levels
The Price Level Setup now allows the user to manage the price levels entirely from the price level setup screen. When the user looks up a price level, all the procedure codes setup for that price level will be displayed on the screen. The previous method of editing the price levels under the procedure setup has remain unchanged.
Price Level Setup
To open an existing price level:
· Click into the No. box and type in the number of the exiting price level or click the lookup (F5) button at the bottom left of the screen to bring up a listing to select form.
To create a price level:
1. Click into the No. box and type in the number that is not being used by another price level.
2. Click Enter on your key bored.
3. Type in a price level description.
a. If the users preferred method is to manage the price levels from the procedure setup screen then click OK and navigate to the procedure setup.
Add CPT codes to the price level:
1. Click 'Add' and a new line will appear.
a. Refer to the Advanced Setup instructions on how to copy an exist price level to another price level.
2. Click into the Procedure box.
a. Type in the code and click enter or
b. Click lookup (F5) to search for a code
3. The CPT code, description, and default pricing will load onto the screen.
4. Edit the price and Expected Reimbursement.
5. Click OK to save.
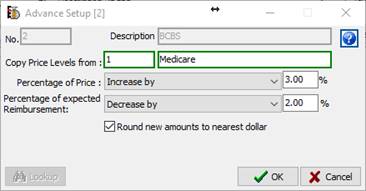
Price level advanced setup
The Advanced Setup allows a user to copy CPT codes and their pricing over from an existing price level and increase or decrease the pricing by a percentage and round to the nearest dollar.
Note: The Copy price level function and increase/decrease pricing function can be run independently or together.
Copy a price level:
1. Click into the "Copy Price Level from" number box.
2. Type in the existing price level to be copied or click lookup (F5) to search price levels.
3. Click enter on the keyboard if the value was typed in.
a. The price level ID and description should be displayed
4. Click "OK"
Note: Pricing from the price level being copied from will overwrite the pricing of any matching CPT code that exists on the price level being copied to.
To Increase or Decrease the pricing:
1. Click on the dropdown next to the pricing that need to be changed.
a. Price - will only update the price column
b. Expected Reimbursement - will only update the expected reimbursement column
2. Select either "Increase by" or "Decrease by".
a. By default "Do Not Change" is selected
3. Type the percentage into in the percent box.
4. Check "Round new amount to the nearest dollar" if the new amount needs to be rounded.
a. "Round new amount to the nearest dollar" only works when using the increase/decrease pricing function
5. Click OK.
Batch Payment
We have made the Batch Payment functionality available to all users. The Bulk payment function will allow a user to rapidly post a payment. The system will apply the payment to each line item and post the payment without the user having to apply the payment line by line. The bulk payment functionality is only for patient payments and client payments (client payment means that they are a non-insurance entity and have a routing ID of -1).
To use the Batch Payment follow the steps below:
1. Navigate to payments> Deposit/Payment Maintenance.
2. A Batch Payment button has been added to Deposit/Payment Maintenance screen.
3. Click the Batch Payment button.
· This will open the Batch Payment screen.
· This screen has all the general fields that are present on the current payment screen and will be used in the same manner.
4. To bring in the encounters, enter either the patient ID or Insurance ID.
5. Select a date range
Note: The date range runs based on date or service.
6. Click Fetch.
· All of the individual line items will display
7. Click OK
· The system will start posting the payment.
· It will start with the oldest date of service and apply the total amount of the line item until the encounter is paid off and then move to the next encounter until the payment amount is fully applied.
· The encounter will remain in its current reasonability
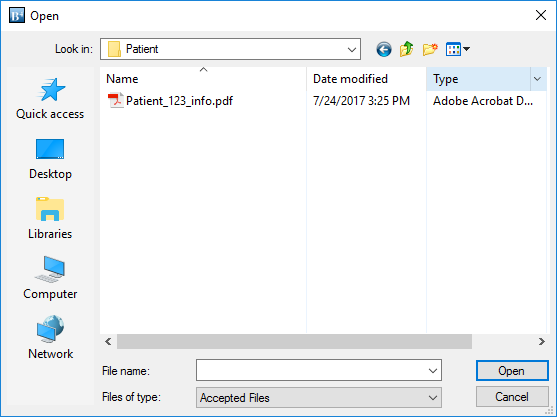
PDF Attachments
DAQbilling has added the ability to attach PDF files from a computer to any designated area in DAQbilling where the option to scan is currently available. The option to attach a PDF file is available anywhere the Scans button is available.
1.
Once the scan button is clicked, it will open
the scan library. From the scan library there will be the option to "Add
File".
![]()
2. After the "Add File" button is clicked, it will display a dialog box. This dialog box will allow the user to search the computer for the file that is to be attached.
a. The dialog box will automatically filter for all accepted file types.
b. When the file is found it can either be double clicked or clicked once to highlight the selected file. Then click open and the file will be loaded into DAQbilling.
Note: The larger the PDF file the longer it will take to upload.
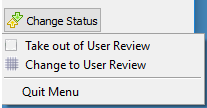
Encounter Review - Change Status
Change Status allows a user to take encounters in and out of a user review status in bulk without having to open the encounter.
Change Status is located on the Encounter Review screen.
Take out of User Review - Will remove the encounter from a user review status and set it back to
Change to User Review - Will put the encounter in a user review status.